Free Next Day Delivery Over £20 | Same Day Dispatch

Next-Day Delivery Over £20 | Same Day Dispatch
Free Next Day Delivery Over £20 | Same Day Dispatch
Next-Day Delivery Over £20 | Same Day Dispatch
Below you will find some easy fixes to problems with new vape kits.
Some new vape kits will require charging before they can be used, though this isn't always the case nowadays. Make sure to plug your new vape kit into a high-quality USB wall plug using the supplied USB cable (if one came with the device). If your vape kit does not come with a USB cable, you can purchase one separately on our website or from other trusted retailers.
We recommend using a genuine smartphone wall plug from a known, quality brand. Avoid using third-party wall adapters bought from third-party sellers on platforms such as eBay or Amazon, as they are usually of inferior quality and could damage the battery inside your vape kit.

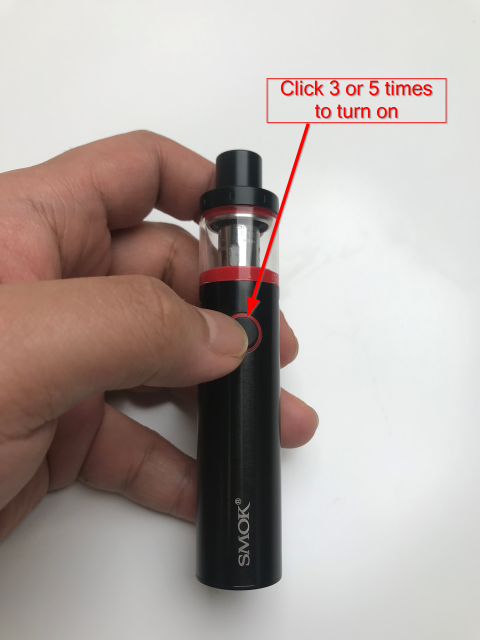
If your newly purchased vape kit is fully charged and is still not firing (or producing any vapour), ensure that the device is turned on.
To power your device on or off, quickly press the fire button 5 times. Another 5 clicks will turn the device off.
If your device does not have a button or a switch, you can disregard this tip. Please note that the number of button presses to power your device on or off can vary by brand; for example, Innokin instead uses a 3-click on/off system on most of their devices.
As always, if you're unsure, refer to the user manual.
If your new kit comes with a coil pre-installed, it could be that the coil has come loose in transit. Tighten the coil to ensure that it is secured snug to the base of the tank.
If your kit uses a pod, make sure that it is inserted correctly into the base of your kit, and that any safety sticker attached to the bottom of the pod is removed before use.
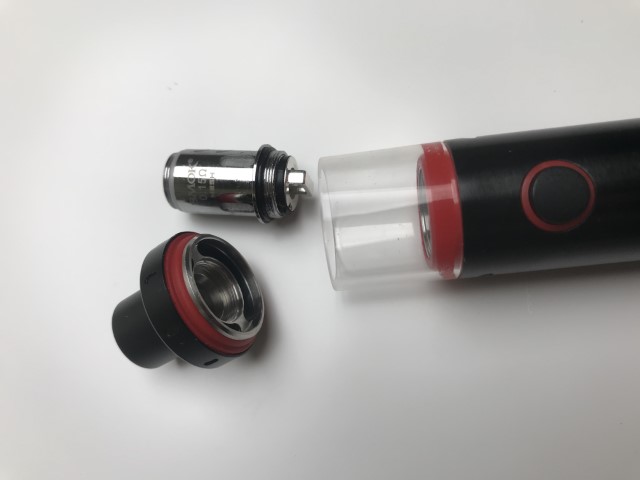
Devices that come with a pre-installed pod have a safety sticker between the battery and the bottom of the pod to prevent the device from accidentally firing during transit. If your new pod kit isn't working and you're getting an error message such as "check coil" or "no atomiser/pod," double check that you've removed the security sticker.
This also applies to tanks which come with a pre-installed coil. Ensure that there is no safety sticker on the bottom of the coil.
If you purchased a more advanced vape kit that requires an external battery rather than a built-in battery, make sure that you've purchased the appropriate batteries for your device and that the battery (or batteries) is inserted correctly. You will usually find the + and - symbols denoting the direction of the batteries marked in the battery compartment.
Always make sure to use batteries that are rated for vaping, such as the ones listed on our website, and check that they are not damaged before using them in your vape mod or kit.

If you've tried all of the above suggestions and are still experiencing issues, reach out and contact us via email at support@vapegreen.co.uk. A member of our expert team will be happy to help you.
Was this article helpful?
If your vape device won't charge or the charging indicator isn't working, try these troubleshooting steps.
Vape HardwareLeaking is one of the most common issues with vape tanks and pods. Here are the most likely causes and how to fix them.
Vape HardwareIf your coils are lasting less than a week, there are several common causes. Learn how to extend your coil life.